ObjectStore Inspector User Guide
Chapter 3
Data Views
Introduction
This chapter describes how to work with ObjectStore collections using data views.
For more information: You can also work with ObjectStore collections using the instance pane of the main database view window. See Chapter 5, Classes and Instances.
In this chapter
This chapter covers the following topics:
Overview
What Is a Data View?
A data view is an Inspector window that displays the instances associated with an ObjectStore collection. A data view is unique to, and saved with, the ObjectStore database on which it is based.
A Data View Contrasted to the Instance Pane
Think of a data view as an instance pane with its own window.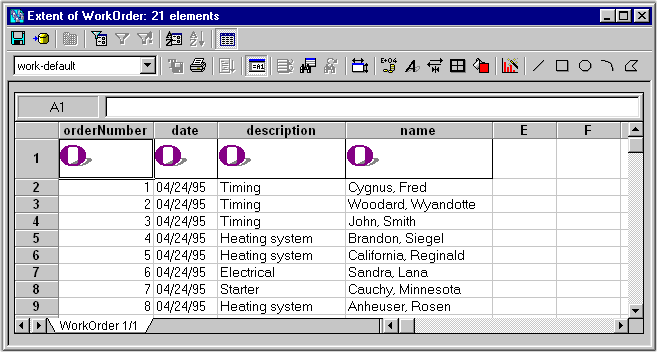
A data view is similar to the instance pane in that you can choose to display information using a collection grid or a collection list. Only data views, however, allow you to manipulate the ObjectStore collection data itself. Consider creating a data view any time you want to
Tip: Remember that you control which data members are displayed for a given instance using the Instance Format dialog box. For more information, see Customizing the Instance Display.
Features for Changing Collection Grid Appearance
Inspector provides a number of features that let you customize the appearance of a collection grid, whether it appears within the instance pane or a data view. You can
For more information: To learn more about working with collection grid features, see Chapter 6, Collection Grids and Lists.
Working With Data Views
This section describes how to create, save, open, and delete a data view.
Creating a Data View
When to create
You can create a data view any time you have an ObjectStore database open in Inspector. You must create a data view if you want to filter or order an ObjectStore collection.
How to create
To create a data view:
- Display the main database view window.
- Populate the instance pane with an ObjectStore collection.
If you need help with this step, see Populating Collection Grids and Lists.
- Click Data View | Create on the menu bar.
Alternative: Select Create Data View from the instance pane shortcut menu.
A data view window appears. The title bar displays the
- At this point, you can either save the data view, or begin customizing its layout or contents as described in the remaining sections of this chapter.
Creating a data view based on an array
If a data member in a class consists of an array, you can create a data view based on that array.
To create a data view of this type:
- Display the Instance Window for the class that contains the data member.
- Right click on the data member. A shortcut menu appears.
- Select Create Data View from the shortcut menu.
A data view window appears, listing the data in the array.
Creating a data view based on a user-defined method
If a class includes a user-defined method to retrieve a set of objects (an extent method), you can create a data view based on the set of objects retrieved by the method.
To create a data view of this type:
- Right click on the class in the Schema Pane.
- Select User-defined Methods | Extent from the shortcut menu and then select the user-defined method.
A data view window appears, listing the data retrieved by the user-defined extent method.
In order to use a user-defined method in this way, it must be registered. For more information about defining and registering user-defined methods, see Chapter 7, User-Defined Methods.
Saving a Data View
When to save
You can save a data view once it has been created. You might want to save a data view right after you create it - instead of waiting until you have finished format and data manipulation. Giving it a more meaningful name can help you stay focused on the data view's purpose while you work with it.
How to save
To save a data view:
- Click File | Save on the menu bar.
Alternative: Click the Save tool on the data view window's toolbar. The Save Data View dialog box appears.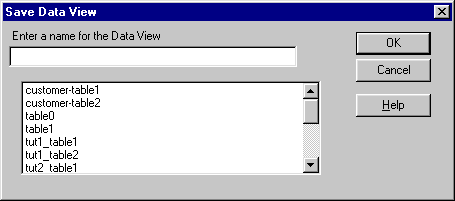
- Type a name in the Data View Name field and click OK.
Tip: Give the data view a name that will help you remember its characteristics should you want to open it at a later time.
The data view is saved with the name you give it. It is available any time you open the current database in Inspector.
Opening a Data View
You can open a data view only if it was saved with the ObjectStore database you are viewing in Inspector.
To open a data view:
- Click Data View | Open on the menu bar.
The Open Data View dialog box appears. Tip: The Open Data View dialog box is similar to the Save Data View dialog box.
- Select the data view you want to open from the list box and click OK to open it.
Alternative: Double-click the data view.
The data view window appears.
Deleting a Data View
To delete a data view:
- Click Data View | Delete on the menu bar.
The Delete Data View dialog box appears. Tip: The Delete Data View dialog box is similar to the Save Data View dialog box.
- Select the data view you want to delete from the list box and click the Delete button to delete it.
Alternative: Double-click the data view.
The data view window is deleted.
Filtering a Collection
What Is a Filter?
A filter is a constraint that you define for a data member value of an ObjectStore collection's instances. It behaves the same way, and has the same purpose, as an ObjectStore query - to mine data from an ObjectStore collection.
One filter for a data view
Each data view can be associated with only one filter. Similarly, you cannot apply a filter to a data view other than the one for which it was created.
Filter constraints
A filter can contain both static and parameterized constraints. A static constraint is one whose value does not change; a parameterized constraint is one that uses a value that must be supplied each time the filter is applied to the ObjectStore collection.
Providing parameterized constraint values
The parameter value is always provided by the user at the time the filter is applied. Depending on how you define the constraint, the user can either
Regardless of which method you use, Inspector displays the Fill Query Parameters dialog box when the filter is applied to the ObjectStore collection.
See Defining Parameterized Constraints for more information.
Two Ways to Define a Filter
Inspector provides two ways to define a filter for an ObjectStore collection.
Other reasons to use the dialog box
The filters you define using the Data Member Constraints dialog box are more versatile than those you can define manually, enabling you to do the following without any knowledge of ObjectStore query syntax. You can
For more information
This section describes how to work with the Set ObjectStore Query Expression and Data Member Constraints dialog boxes. See the ObjectStore Advanced C++ API User Guide for information on ObjectStore queries.
When Are Filters Applied?
Inspector applies a filter to an ObjectStore collection at the time you create the filter, regardless of how you define it. This gives you the opportunity to verify that the filter is performing as required. If it is not, you can reopen it and then modify it.
How to turn filters on and off
Once a filter has been defined, you can turn it on and off whenever you want.
To turn a filter on and off, click Data View | Filter On on the menu bar, or click the Toggle Filter tool on the data view window toolbar.
Tip: A filter is on when a check mark appears alongside Filter On on the Data View menu, or when the Toggle Filter tool is selected.
How to reapply a filter
You can reapply a filter at any time. In particular, you might want to consider reapplying a filter to an ObjectStore collection
To reapply a filter, click Data View | Reapply Filter on the menu bar, or click the Reapply Filter tool on the data view window toolbar.
Defining a Filter Manually
You use the Set ObjectStore Query Expression dialog box to manually define collection filters.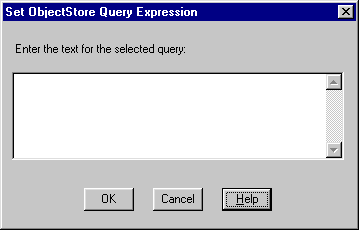
If you are not familiar with ObjectStore query syntax, use Inspector to define the filter. See Defining a Filter Using Inspector.
How to use
To manually define a filter:
- Click Data View | Set Filter Expression on the menu bar.
- Enter the query expression - you must use ObjectStore query syntax.
- Click OK to create the filter.
Defining a Filter Using Inspector
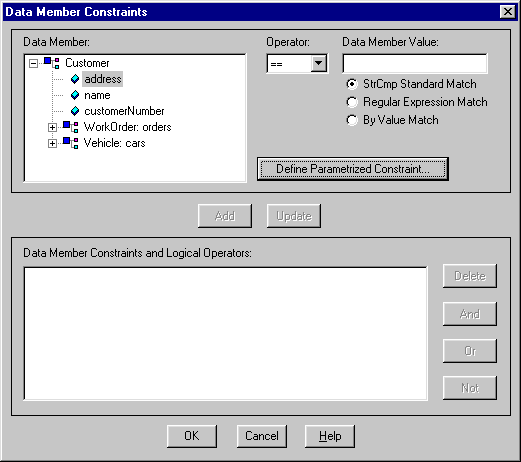
You use the Data Member Constraints dialog box when you want Inspector to help you define a filter.
How to open
To open the Data Member Constraints dialog box, click Data View | Define on the menu bar, or click the Define Filter tool on the toolbar.
Usage tips
The Data Member Constraints dialog box has several features that simplify the process of defining a filter.
Note: The Data Member list box can display data members of classes that participate in recognized relationships only. A recognized relationship is one that is either
For more information on how Inspector works with ObjectStore relationships, see Identifying Relationships Between Classes.
Displaying the filter query
The filters you define using Inspector are translated into ObjectStore query language when the filter is created. You can display translated filter queries in the Show Filter Expression dialog box.
To display a translated filter query, click Data View | Show Filter Expression on the menu bar. 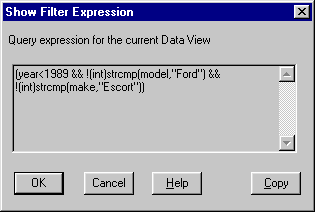
Tip: If you are defining filters manually, you can use the Copy button to copy query elements to the clipboard for pasting.
Definition process
You define a filter with the Data Member Constraints dialog box, using the following process:
Defining Parameterized Constraints
You define a parameterized constraint using the Parameter Definition dialog box.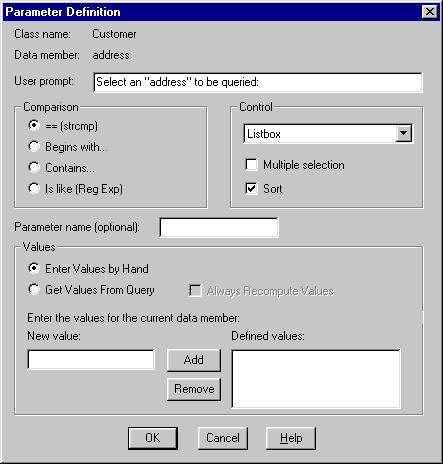
Note that the fields in this dialog box vary based on whether you are defining a parameterized constraint for string or integer types. The dialog box shown here is for string types.
How to define a parameterized constraint for string types
To define a parameterized constraint for string types:
- Follow the procedure for defining a filter as described in Definition process.
- At step 3 of that process, select the data member with which you want to associate the parameterized constraint from the Data Member list box and click the Define Parameterized Constraint button.
The Parameter Definition dialog box appears.
- Enter text in the User Prompt field for the prompt you want to appear in the Description field of the Fill Query Parameters dialog box.
- Select the comparison value you want to use for this data member.
- In the Control group box, select the type of control for the Value field of the Fill Query Parameters dialog box:
- Optionally, name the parameter.
- Are you using an edit box control for the Value field of the Fill Query Parameter dialog box?
If yes, you are done defining the parameterized constraint. Go to step 13. If no, go to step 8.
- Click the Multiple Selection and Sort check boxes if you want to enable this functionality in the Value field.
- Do you want the user to select from a list of actual data members to provide the parameter value?
If yes, click Get Values From Query and go to step 13.
If no, go to step 10.
- Click Enter Values By Hand and go to step 11.
- Define the list of parameter values from which you want the user to be able to select:
- Type a name in the New Value field.
- Click Add to place the value in the Defined Values list box.
Tip: Click Remove to remove a value from the Defined Values list box.
- Select the Always Recompute Values check box if you want Inspector to refresh the collection each time the filter is applied.
- Click OK to return to the Data Member Constraints dialog box.
- Go to step 2 if you want to define a parameterized constraint on another data member in the filter. Otherwise, click OK to finish defining the filter.
The filter is applied to the collection. Inspector displays the Fill Query Parameters dialog box. See Using the Fill Query Parameters dialog box.
How to define a parameterized constraint for integer types
To define a parameterized constraint for integer types:
- Follow the procedure for defining a filter as described in Definition process.
- At step 3 of that process, select the data member with which you want to associate the parameterized constraint from the Data Member list box and click the Define Parameterized Constraint button.
The Parameter Definition dialog box appears.
- Enter text in the User Prompt field for the prompt you want to appear in the Description field of the Fill Query Parameters dialog box.
- Select the operator you want to use for this data member.
- Select the type of control for the Value field of the Fill Query Parameters dialog box from the Control drop-down list box:
- Optionally, name the parameter.
- Are you using an edit box control for the Value field of the Fill Query Parameter dialog box?
If yes, you are done defining the parameterized constraint. Go to step 10. If no, go to step 8.
- Define the list of parameter values from which you want the user to be able to select:
- Type a name in the New Value field.
- Click Add to place the value in the Defined Values list box.
Tip: Click Remove to remove a value from the Defined Values list box.
- Select the Always Recompute Values check box if you want Inspector to refresh the collection each time the filter is applied.
- Click OK to return to the Data Member Constraints dialog box.
- Go to step 2 if you want to define a parameterized constraint on another data member in the filter. Otherwise, click OK to finish defining the filter.
The filter is applied to the collection. Inspector displays the Fill Query Parameters dialog box. See Using the Fill Query Parameters dialog box.
Using the Fill Query Parameters dialog box
If you defined a parameterized constraint for one of the data members included in the filter, Inspector displays the Fill Query Parameters dialog box when the filter is applied to the collection.
To complete the dialog box:
- Double-click the Value field.
The Value field becomes editable, displaying the type of control you defined for it.
- If the control is a type of list, select the values from the list. Otherwise, type a value in the field.
- If necessary, go to step 1 for any other parameterized constraints that are defined for this filter.
- Click OK to close the dialog box and complete the filter.
Inspector redisplays the collection within the data view. The values displayed are based on the filter just applied to the collection.
- To redisplay the entire collection, turn off the filter.
Ordering a Collection
In addition to filtering an ObjectStore collection, you can order an ObjectStore collection based on the values of one of the data member's instances. You use the Sort Order dialog box to define a collection order.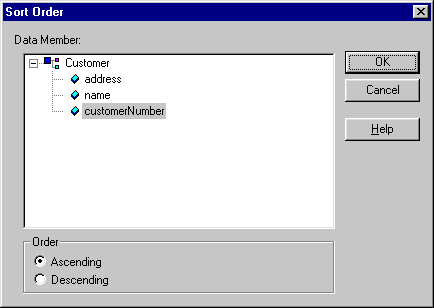
Selecting Data Members
Only data members with either an integer or string type can be used to order an ObjectStore collection. In addition, the Data Member list box can display data members of classes that participate in recognized relationships only. A recognized relationship is one that is either
For more information on how Inspector works with ObjectStore relationships, see Identifying Relationships Between Classes.
When Does the Order Take Effect?
A collection order takes effect at the time you define the order. This gives you the opportunity to verify that the order sorts the collection as you want it to. If it does not, you can delete it, or open it and modify it.
How to turn orders on and off
Once a collection order has been defined, you can turn it on and off whenever you want.
To turn a collection order on and off, click Data View | Collection On on the menu bar, or click the Toggle Order tool on the data view window toolbar.
Tip: A collection order is on when a check mark appears alongside Order On on the Data View menu, or when the Toggle Order tool is selected.
How to Define a Collection Order
To define a collection order:
- Click Data View | Define Order on the menu bar.
The Sort Order dialog box appears
- Select the data member on whose instances you want to order the collection.
- Click the Ascending or Descending radio button to determine the collection order.
- Click OK.
The collection is redisplayed based on the order you just defined.
Note: The collection's original order is restored when you turn the order off.
[previous] [next]
Copyright © 1999 Object Design, Inc. All rights
reserved.
Updated: 05/07/99 16:42:44