ObjectStore Inspector User Guide
Chapter 5
Classes and Instances
Introduction
This chapter describes how you use Inspector to work with classes and instances in an ObjectStore database.
In this chapter
This chapter covers the following topics:
Where Instances and Classes Are Displayed
This section describes where and how Inspector displays instances and classes.
Instance Pane
The database view contains a Database Roots pane, a schema pane, and an instance pane. The instance pane occupies the right side of the database view window.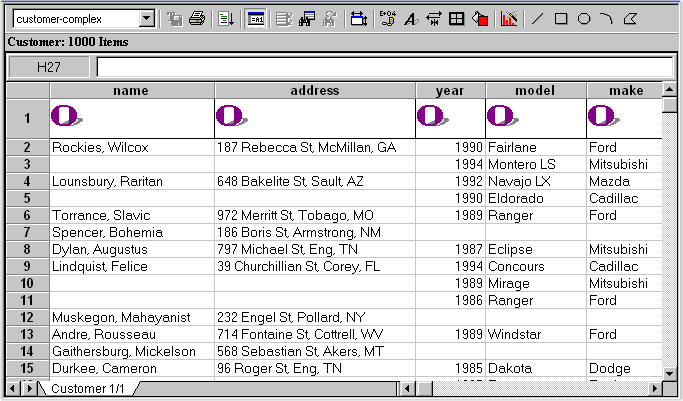
Default instance information
By default, Inspector shows the class's address in persistent memory, along with an icon. You can change the information displayed for class instances to include its data members, and you can select different icons to represent the instance. See Customizing the Instance Display for more information.
You can display instances using a list
Inspector displays instances using the collection grid by default. If you want, you can display instances in a collection list. See Chapter 6, Collection Grids and Lists for more information.
Instance Window
The Instance window shows all the data members for a particular instance, one instance at a time.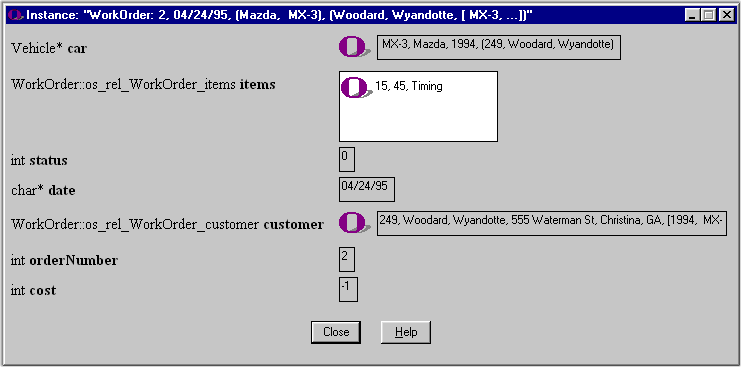
Information about each data member includes its name, type, and value.
Purpose
You can use the Instance window to
How to open the Instance window
To open the Instance window:
- Select the instance.
- Select Instance | Open Instance Window from the menu bar, or select Open Instance Window from the instance shortcut menu.
Alternative: Double-click on the instance (in the collections grid or instance list, for example).
How to dump data member values to a file
To dump data member values to a file:
- Open the Instance window for the instance containing the data member whose values you want to dump to a file system.
- Select Dump to File System from the shortcut menu of the appropriate data member.
The Save As dialog box appears.
- Type a name in the File Name field and click Save.
How to display character strings using a hexadecimal viewer
By default, data member values are displayed as character strings. You can display character strings in a hexadecimal viewer.
Tip: If you display a character string in a hexadecimal viewer, you can also
To display a character string using a hexadecimal viewer:
- Open the Instance window for the instance containing the data member whose values you want to display in a hexadecimal viewer.
- Select Show String in Hexadecimal Viewer from the shortcut menu of the appropriate data member.
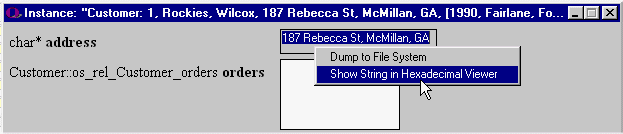
The field changes to display the character string in hexadecimal format. 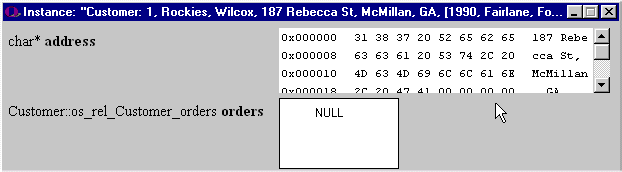
- Optionally, display the segment offset by selecting Show Offset Inside Segment from the hexadecimal viewer shortcut menu.
Data Views
Data views are similar in appearance and functionality to the instance pane of the database view in that you can use them to display instances in either collection grids or collection lists.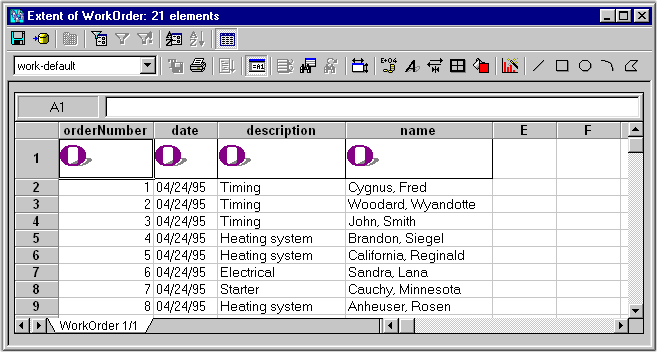
Data views are distinct from the instance pane in that you can manipulate the instances in a data view using filters and by changing the order in which instances are displayed. Data views you define can be saved and reused.
For more information: To learn more about data views, see Chapter 3, Data Views.
Instance: Physical Layout Property Dialog Box
The Instance: Physical Layout property dialog box displays information about the physical characteristics of a particular data member.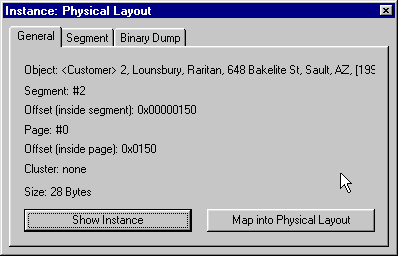
The dialog box has separate pages for the following types of information:
You can open the Physical Database Layout window from this dialog box by clicking the Map Into Physical Layout button.
How to open the Instance: Physical Layout dialog box
To open the Instance: Physical Layout dialog box:
- Select the instance.
- Select Instance | Show Physical Details from the menu bar.
Alternative: Select Show Physical Details from the instance shortcut menu.
Class Details Dialog Box
The Class Details dialog box displays the C++ declaration of the class.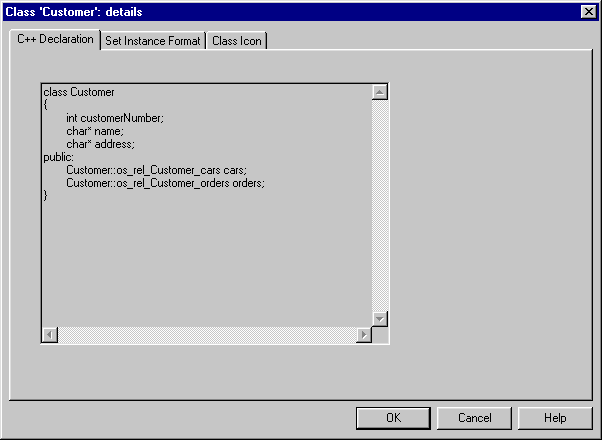
In addition, it contains two pages, Set Instance Format and Class Icon, that let you customize the class and instance display within Inspector. See Customizing the Instance Display for more information.
How to display the Class Details dialog box
To display the Class Details dialog box:
- Select the class you want to work with from the schema diagram.
- Click Schema | Show Class Details on the menu bar.
Alternative: Click Show Details on the class shortcut menu.
Physical Database Layout Window
The Instances pane of the Physical Database Layout window displays the instances that are stored within a given segment (the segment selected in the Segments pane).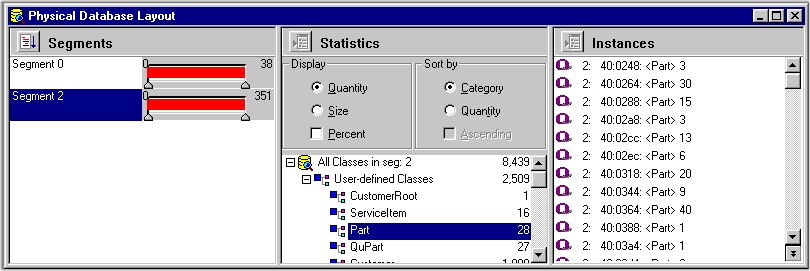
How to open the Physical Database Layout window
To open the Physical Database Layout window, select Tools | Physical Database Layout from the menu bar.
For more information: To learn more about the Physical Database Layout window, see Chapter 9, Tools for Physical Analysis.
Customizing the Instance Display
This section describes how to use the Instance Format dialog box and other features to customize the display of instances in Inspector.
What Information Is Displayed by Default
By default, Inspector displays the following information for each class instance:
This information appears wherever the instance is displayed - collection grids, collection lists, the Navigation window, and so on.
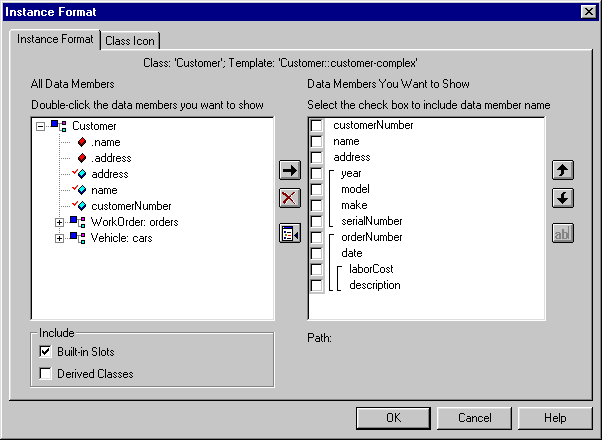
Using the Instance Format Dialog Box
The Instance Format dialog box is a powerful tool for customizing instance formats. 
Tip: These features are also available on the Class Properties dialog box, which you can display by clicking Schema | Show Class Details on menu bar.
You can use the Instance Format dialog box to control many aspects of how instances are displayed in Inspector. You can choose to
Note: You can display data members of classes that participate in recognized relationships only. A recognized relationship is one that is either
For more information on how Inspector works with ObjectStore relationships, see Identifying Relationships Between Classes.
Example
 Consider the following simple database:
Using the Instance Format dialog box, you could create a display for instances of the person class that included, say, courses, tuition, and salary data members as appropriate. In addition, you could rename the courses data member associated with the professor class to courses taught, for example.
You could also associate different icons with each class to help distinguish the class to which a particular data member belongs. See Associating an Icon with a Class for more information.
Displaying the Instance Format Dialog Box
To display the Instance Format dialog box, select Instance | Set Instance Format from the menu bar or from the instance shortcut menu.
Alternative: Click the Set Instance Format tool on the toolbar.
Selecting Data Members for Display
How to identify data members for display
To identify data members for display:
- Open the Instance Format dialog box.
The All Data Members list box displays all data members associated with the class. Tip: You can alter the contents of the list by clicking the Built-In Slots and Derived Classes check boxes.
- To move a data member to the Data Members to Show list box, double-click the data member.
Alternative: Click the data member and then click the right arrow button.
- If you want to display the member variable name as part of the data member, click the check box to the left of the data member.
- Click the OK button.
If you change your mind
To remove a data member from the Data Members to Show list box:
- Click the data member in the Data Members to Show list box.
- Click the X button.
Alternative: Double-click the data member in the Data Members to Show list box.
How to reorder a list of data members
By default, data members are displayed for an instance in the order in which you select them from the All Data Members list box. If you want, you can change the display order.
To change the data member display order:
- Click the data member you want to reorder in the Data Members to Show list box.
- Click the up or down arrow button to change the order in which the data members will be displayed.
How to rename a data member
You can rename a data member. Note that this change affects the data member name only as it is displayed within Inspector. It does not alter the actual ObjectStore data member name. You might want to do this in order to simplify the presentation for reporting purposes, especially for a nontechnical audience.
To rename a data member:
- Click the data member you want to rename.
- Click the ab| button.
An edit cursor appears at the beginning of the data member name.
- Edit the name as needed. Be sure to delete any unneeded characters.
- Press Enter.
Associating an Icon with a Class
By default, Inspector displays each class instance with the ObjectStore logo. You might want to associate more meaningful pictures with your classes. This can help you identify particular classes at a glance, which can be especially useful as your databases become more complex.
Choosing an icon
Inspector comes with a library of icons in different categories - computer, office, tools, for example. This library is visible from the Class Icon page of the Instance Format dialog box.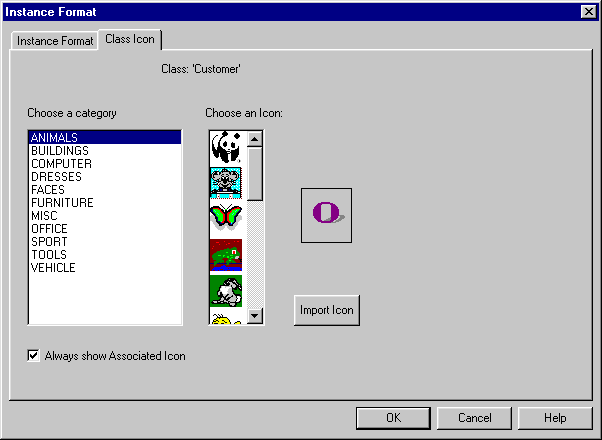
You can choose an icon from this library, or import bitmaps of your own.
Note: You cannot import bitmaps if you are using Inspector on UNIX.
Determining when to display an icon
By default, icons are associated with a class wherever the class appears. You can override this default in several places.
How to associate an icon with a class
To associate an icon with a class:
- Open the Instance Format dialog box.
- Click the Class Icon tab.
The class name appears at the top of the Class Icon page.
- Click the category of icons you want to browse.
- Scroll the list of icons.
- When you find the icon you want, click it.
The icon appears in the preview field to the right of the icon list.
- Click OK.
How to import an icon
To import an icon:
- Open the Instance Format dialog box.
- Click the Class Icon tab.
- Click the Import Icon button.
The Open dialog box appears.
- Open the icon (.ico) file you want to use.
The icon appears in the preview field to the right of the icon list.
- Click OK.
Instance Display Options
The Instances page of the Options dialog box contains a number of features that affect the display of instances in Inspector.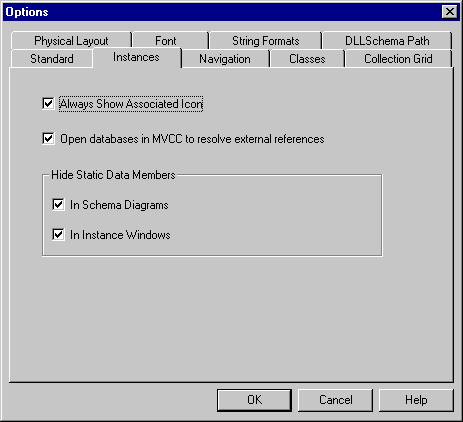
Choices on this page let you determine whether or not to
Fonts
The Fonts page of the Options dialog box lets you select the font you want to use to display instance information in collection grids, collection lists, and the Instance window.
For more information: To learn more about Inspector options, see Inspector Options.
Customizing a Collection Grid
As described earlier, you can customize instances by selecting which data members you want to display and by associating icons with a class. In addition, you can customize the collection grid itself.
This section lists the different ways you can customize a collection grid, and collection grid features. See Chapter 6, Collection Grids and Lists for more information.
Ways You Can Customize a Collection Grid
Generally speaking, there are two ways to customize the appearance of a collection grid. You can
Other Collection Grid Features
In addition to customizing the appearance of a collection grid, Inspector provides other features to help you work with collection grids, whether they appear in the instance pane of the main database view or in data views.
For More Information
Collection grids can be displayed both in the instance pane of the main database view and in data views. Choices for customizing collection grid appearance are the same, regardless of where the collection grid is being used.
See Chapter 6, Collection Grids and Lists for a complete description of the procedures you can use to customize collection grids and of other collection grid features.
Navigating Instances
Navigation is the process of following relationships from one instance to another. When you navigate instances, Inspector records the resulting navigation tree in the Navigation window.
This section describes the different ways you can navigate instances and the features of the Navigation window.
For more information: You can also locate an instance based on its address or segment offset. See Tools for Debugging.
Two Ways to Navigate
There are two ways to navigate instances:
How to Navigate Manually
To navigate manually:
- Open an Instance window for the instance whose relationships you want to navigate.

Tip: See How to open the Instance window if you need help.
- Place the pointer on the related instance to which you want to navigate.
Tip: The pointer changes to a magnifying glass when it is placed on a navigable instance.
- Double-click to navigate to that instance.
A new Instance window appears, displaying information for the instance to which you just navigated.
In addition, Inspector opens a Navigation window that records the path to each instance you navigate. The window is minimized and appears in the lower left corner of the Inspector workspace.
- Repeat step 2 and step 3 to navigate to other related instances.
Navigating Automatically
Recognizing relationships
When you use automatic navigation, Inspector navigates only recognized relationships. A recognized relationship is one that is either
For more information on how Inspector works with ObjectStore relationships, see Identifying Relationships Between Classes.
How to navigate automatically
To navigate all related instances automatically:
- Select the instance you want to navigate.
- Click Navigation | Auto Navigate from the menu bar, or click Auto Navigate on the instance shortcut menu.
Alternative: Press the Ctrl key and click the instance you want to automatically navigate. Inspector opens a Navigation window that displays all navigable instances of the instance you selected in step 1.
About the Navigation Window
The Navigation window helps you keep track of the instance relationships you have navigated, whether manually, from the Instance window, or automatically, using the Auto Navigate feature.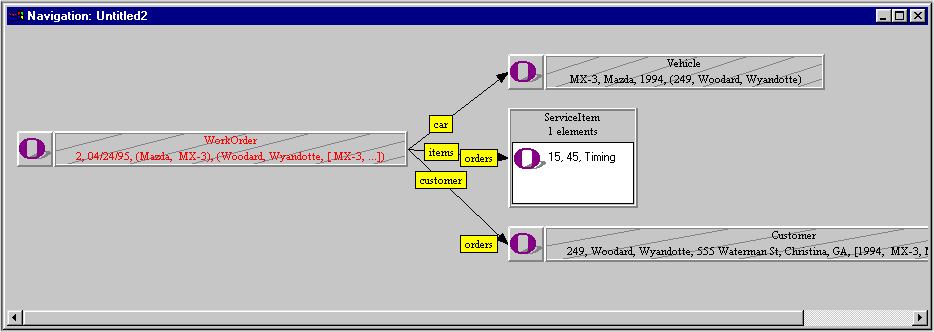
Navigation window symbols
The Navigation window displays symbols that represent
Formatting navigation trees
You might want to consider changing the following characteristics of the navigation tree before printing a Navigation window.
For more information: To learn more about printing Inspector information, see Appendix A, Printing.
Saving navigation trees
One of the benefits of the Navigation window is that it records the path you have taken through the database while inspecting classes and their instances. Because object databases can be complex, it can be valuable for you to be able to save the tree resulting from a particular navigation session, regardless of whether you created it manually or automatically.
To save a navigation tree:
- Click File | Save on the menu bar.
The Save Navigation Tree dialog box opens.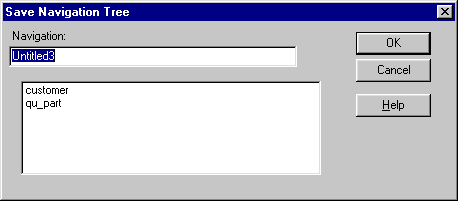
- Name the navigation tree and click Save.
The navigation tree is saved with the database.
Opening a navigation tree
To open a navigation tree you have saved previously:
- Click Navigation | Open Navigation Tree on the menu bar.
The Open Navigation Tree dialog box appears. Tip: The Open Navigation Tree dialog box is similar to the Save Navigation Tree dialog box.
The list box displays all the navigation trees associated with the current database.
- Select the navigation tree you want to open from the list box and click the OK button.
Alternative: Double-click the navigation tree name.
The Navigation window containing the navigation tree you selected appears.
Deleting a navigation tree
To delete a navigation tree:
- Click Navigation | Delete on the menu bar.
The Delete Navigation Tree dialog box appears. Tip: The Delete Navigation Tree dialog box is similar to the Save Navigation Tree dialog box.
The list box displays all the navigation trees associated with the current database.
- Select the navigation tree you want to delete from the list box and click the Delete button.
Other Navigation window features
In addition to the layout features already described, you can use the Navigation window shortcut menu to
Navigation Options
The Navigation page of the Options dialog box contains default settings for preferences for Navigation windows.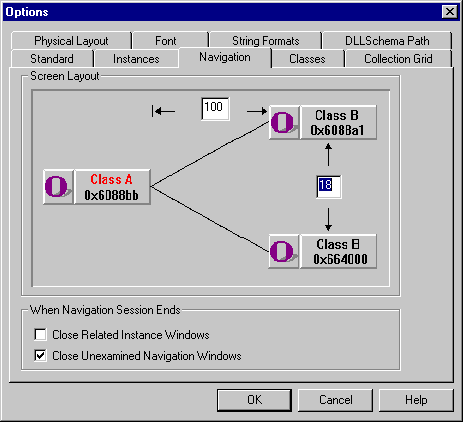
Choices on the Navigation page let you set default values for
To learn more about Inspector options, see Inspector Options.
Identifying Relationships Between Classes
You typically create a relationship between two classes as part of defining an ObjectStore database. Among other things, the presence of these relationships enables Inspector to autonavigate from one class to another.
This section describes how Inspector uses information that is not part of the schema definition to identify relationships in an ObjectStore database.
Inspector Creates Some Relationships Automatically
Inspector creates a relationship between two classes when one class, say ServiceItem, contains a data member that is a templated ObjectStore collection or os_reference consisting of instances from another class, say QuPart. By definition, these collections consist of a homogeneous set of instances, making the relationship between the two classes meaningful.
Inspector Identifies Possible Relationships
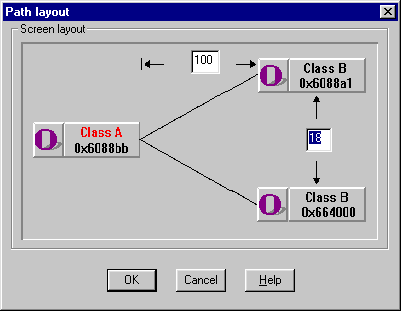
If WorkOrder, on the other hand, is a nontemplated collection or a nontemplated os_reference, Inspector first reviews the collection's instances. If it determines that all of the instances are of the same type, it displays the following dialog box, suggesting that a possible relationship exists and giving you the opportunity to create it.
Click Yes to establish relationships between the two classes shown in the dialog box. If you click No, you can create the relationship later as follows.
- In the Schema Pane right click on a class and select Examine Relationships from the shortcut menu. The Examine Oneway Relationships dialog box is displayed showing relationships that have already been created as well as possible relationships that have not yet been created.
- Click on the checkbox next to the relationship you want to create.
Relationships Between Java Classes
In Java databases, Inspector automatically creates a one-way relationship between the abstract class Object and a subclass when the subclass has a field with a collection data type such as com.odi.coll.set. (ObjectStore maps the class os_dma_singleton to the Java class Object .)
.)
In this example, a one-way relationship between Customer and Object is created based on the myCars field in the Customer class, which has the type com.odi.coll.set.
If you then open an instance of Customer, Inspector identifies a possible relationship between Customer and Cars. If you decide to create this relationship, Inspector removes the relationship it created between Customer and Object, leaving only the one between Customer and Car.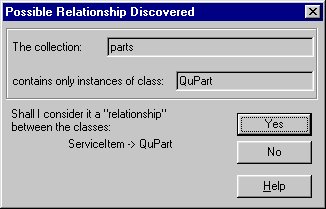
Other Areas Affected by Relationships
There are other areas of Inspector that are affected by the relationships Inspector is able to recognize. These include selecting data members for
Editing Data Members
This section describes how to edit data members using the Edit Data Member dialog box.
Use Care When Editing Data Members
When you edit a data member, you are editing a value in an ObjectStore database. Be sure that you are aware of all the effects changing a data member might have on your database and the applications that use it.
Example
Consider editing an instance of type char*. If you edit this instance using the Edit Data Member dialog box, you need to decide whether to
Making any of these choices might cause side effects that Inspector cannot predict. Alternatively, you could use manage this behavior using user-defined methods.
For more information: See Chapter 7, User-Defined Methods to learn more about user-defined methods.
Using the Edit Data Member Dialog Box
The Edit Data Member dialog box has a number of features that allow you to edit several types of instances.
The Editable Data Members list box appears on the left side of the dialog box. It displays all the editable data members of the instance you have selected from the database.
Tip: Once you edit a data member value, the data member type and name appear in italics.
The right side of the dialog box, which is initially empty, displays different tools based on the data member you select.
How to open the Edit Data Member dialog box
To open the Edit Data Member dialog box:
- Select the instance you want to edit.
- Click Instance | Edit on the menu bar, or select Edit from the instance shortcut menu.
How to Edit a Data Member
Prerequisite
In order to edit a data member, you must have write access to the ObjectStore database in which the instance to which it belongs is stored. If you have navigated to an instance in a database other than the one you opened in Inspector, your ability to write to that database is controlled by the Open Databases in MVCC to Resolve External References field on the Instances page of the Options dialog box.
This option is selected by default, which means that you will not have the write access required to edit navigated instances.
For more information: See Inspector Options to learn how to set options.
Changing your mind
Inspector provides several ways for you to undo edits to data members before committing them to ObjectStore. You should be familiar with these methods before editing a data member value.
Data member editing procedure
The basic procedure for editing data members using the Edit Data Member dialog box is shown here. Information specific to editing different types is provided following the procedure.
To edit a data member:
- Select the instance containing the data member you want to edit.
- Open the Edit Data Member dialog box.
- Select the data member whose value you want to edit from the Editable Data Members list box.
The contents of the dialog box change based on the type of the data member you selected.
- Make the edits you require.
The Original Value button appears beneath the edit field.
- Click OK to complete the change.
Inspector displays a dialog box asking you to confirm the edit.
- Click Yes to review each edit independently.
Click Yes to All if you want Inspector to accept all edits without any additional confirmation.
Recommendations for Editing Specific Types
char and char*
You can edit character strings (type char) and pointers (type char*) using either the literal value or the hexadecimal value. 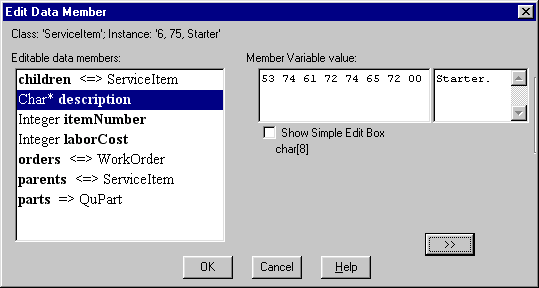
If you choose to edit the hexadecimal value, make sure that the string terminates with 00 (null). If you do not terminate the string with the null character, Inspector interprets the data member type as blob.
Enumerated types
When you edit an enumerated type, you choose from a list of valid values in the Member Variable Value field. For example, for a type of EnumSize, the Member Variable Value field might display a list containing small, medium, and large.
Memory and pointers to memory
When you edit a data member variable that is either a block of memory or a pointer to memory, you can change the hexadecimal value.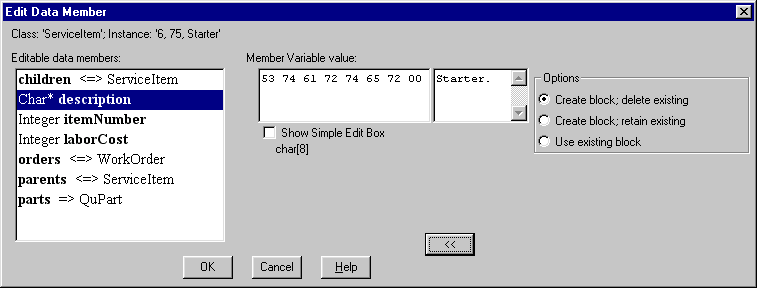
You have three choices regarding the block of memory itself.
Note that new blocks of memory are always created in the default segment.
Relationships
You edit relationships by adding instances to or removing instances from the relationship as shown in the Member Variable Value list box.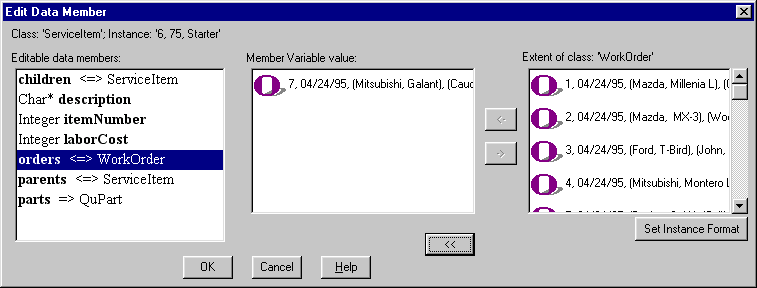
Tip: The <=> symbol identifies relationships in the Editable Data Members list box.
If you click the expand button (>>), the Edit Data Member dialog box displays the extent of the class related to the class whose instance you are editing in the Extent of Class list box. (If this list box is empty, it means either that the extent is empty or that Inspector does not know where to locate the extent.) You use the right arrow button to remove instances from the relationship; you use the left arrow button to add instances to the relationship.
Note that Inspector maintains referential integrity for ObjectStore relationships. For example, consider a Triumph vehicle instance associated with (owned by) a Smith customer instance. If you edit the Triumph instance and associate it with, say, Homer, that Triumph is no longer owned by Smith once you confirm the edit.
C++ pointers and C++ references
You edit pointers in the same way you edit relationships: by adding and removing instances. Remember, to display instances, click the expand (>>) button.
Tip: The => symbol identifies pointers in the Editable Data Members list box.
To make a pointer point to an instance:
- Select the instance from the Extent of Class list box.
- Click the left arrow to place the instance in the Member Variable Value entry field.
- Click the OK button.
To set a pointer to NULL:
- Select the instance in the Member Variable Value entry field.
- Click the right arrow to remove the instance.
- Click the OK button.
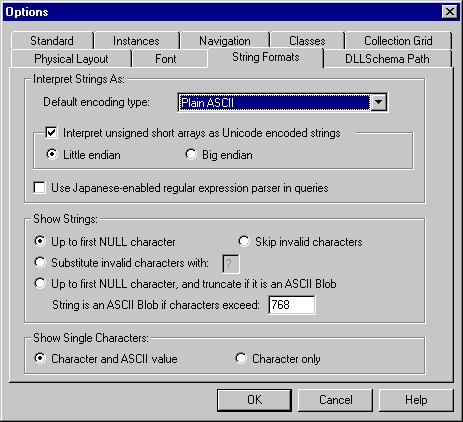
Interpreting and Displaying Strings
Overview
C++ enables you to encode strings in several formats, the most common of which is ASCII. The String Formats page of the Options dialog box contains options that
You can use these options to make the information you see in Inspector consistent with its native format, that is, the format in which you are familiar with it.
For more information: To learn more about options and how to set them, see Inspector Options.
When Are Interpretation and Display Rules Used?
By default, Inspector interprets (and displays) any string with more than 768 characters as an ASCII blob. Instances that are interpreted as blobs are displayed using a hexadecimal viewer.
Strings with fewer than 768 characters are interpreted and displayed based on the rules you select.
Interpreting Strings
By default, Inspector interprets strings using plain ASCII. You use the options in the Interpret Strings As group box to
ASCII alternatives
You can use the Default Encoding Type drop-down list to select an alternative to plain ASCII:
Interpreting unsigned arrays
By default, unsigned arrays are interpreted as Unicode encoded strings in little endian format; big endian format is also supported. If the Automatically Recognize SJIS, JIS, or EUC field is not checked, unsigned arrays are displayed as arrays of numbers.
Displaying Strings
The options in the Show Strings group box let you define
When is a string a blob?
By default, a string is interpreted as a blob if it exceeds 768 characters.
Display options
If a string is not interpreted as a blob, you can display the string
If the string is interpreted as a blob, you can choose to display the string in ASCII, up to the first NULL character; remaining characters are truncated.
Displaying Single Characters
By default, Inspector displays single characters along with their ASCII values. For example, the letter D is shown as `D' (68). If you want, you can display single characters by themselves.
Overriding Inspector Defaults
You can override default settings for individual data members using the Data Member String Format dialog box.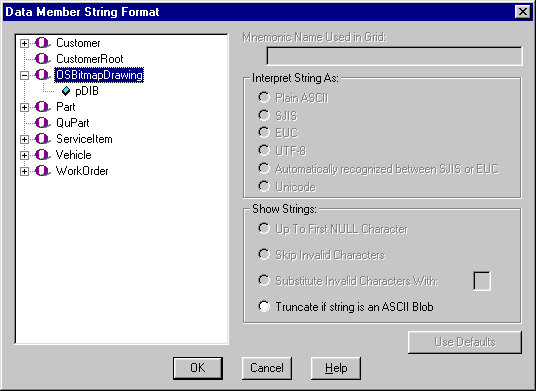
The settings on this dialog box are the same as those on the String Formats page of the Options dialog box.
How to display the Data Member String Format dialog box
To display the Data Member String Format dialog box:
- Display a database view.
- Select the schema pane.
Note: You cannot use the tree hierarchy format for this procedure.
- Click Schema | Data Member String Format on the menu bar.
Alternative: Click Set Attribute Format on the diagram content menu.
The Data Member String Format dialog box appears.
Making Internal Classes Accessible
By default, ObjectStore internal classes are not accessible in Inspector. These classes are part of every ObjectStore database, but Inspector filters them out to simplify the schema presentation.
This section describes how to override this default.
How Internal Classes Are Identified
Inspector uses these strings to identify which classes to omit from the schema:
(ObjectStore internal classes typically begin with either of these strings.)
Use the Classes Option to Override
You can use the Classes page of the Options dialog box to override this default.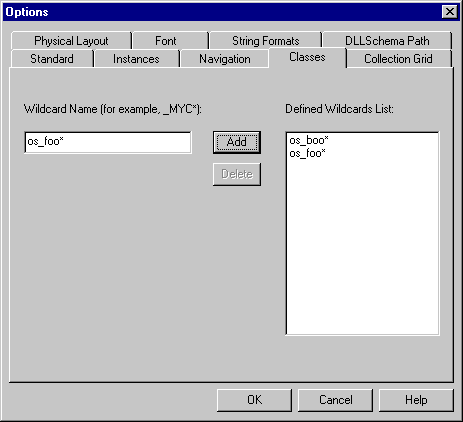
You use this page to define wildcards that represent the classes Inspector would otherwise hide. The wildcards you use should be as narrow as possible to avoid loading the schema with unnecessary detail.
Tip: If you do not know how to work with the Options dialog box, see Inspector Options.
When to use
Consider the Classes option if you have used either os_ or _ to prefix user-defined class names, or if you want Inspector to make certain ObjectStore classes accessible - ObjectStore Personal Object Manager classes, for example.
Important: Inspector makes internal classes available by redefining them as user-defined classes. Be careful when deciding which internal classes you want to make accessible. Redefining os_collection and os_reference, for example, as user-defined classes, can affect the collection and filtering functionality associated with these objects.
How to use the Classes page
To use the Classes page:
- Display the Classes page of the Options dialog box.
- Enter the wildcard in the Wildcard Name field.
- Click the Add button to place the wildcard in the Defined Wildcards List list box.
If you change your mind about a wildcard, click the Delete button to remove the wildcard from the list box.
- Repeat step 2 and step 3 to define other wildcards.
- Click OK.
Inspector displays an informational message.
- Click OK.
- Reopen the database by clicking File | Open on the menu bar or by clicking the Open tool on the toolbar.
The Open dialog box appears.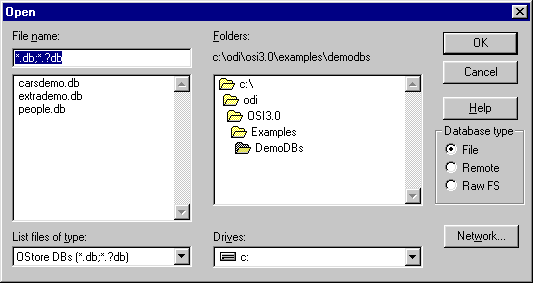
- Select the database from the list box.
- Click the Ignore Stored Metaknowledge check box.
Inspector displays an informational dialog box notifying you that it is going to close all active documents.
- Click Yes.
Inspector closes and then reopens the database. The Database Roots and schema panes display any classes defined using the wildcards you defined in step 2.
For more information: To learn more about metaknowledge, see Appendix C, Working with Metaknowledge.
[previous] [next]
Copyright © 1999 Object Design, Inc. All rights
reserved.
Updated: 05/07/99 16:43:06