ObjectStore Inspector User Guide
Appendix A
Printing
Introduction
One of the ways Inspector helps you communicate information about an ObjectStore database is by giving you the ability to print
This chapter describes how to use Inspector's printing features.
For more information
Another way to distribute information about an ObjectStore database is to use Inspector as an OLE server. For more information, see Appendix B, Using Inspector as an OLE Server.
In this chapter
This chapter covers the following topics:
Printing Schema Diagrams
This section describes how to print schema diagrams.
Before You Begin
Before printing a schema diagram, you might want to
See Chapter 4, Schema Diagrams for more information.
Controlling Printed Output
There are several features that help you control the printed output of a schema diagram.
Print Preview
Print Preview (File | Print Preview) shows you how the classes in your schema diagram will be printed relative to a single page. Note that the zoom level of the schema diagram itself does not affect print size.
Print on Multiple Pages
Print on Multiple Pages (File | Print on Multiple Pages) lets you change the number of pages (horizontal and vertical) over which your schema diagram will be printed. Generally speaking, the more pages you use, the larger the classes on the printed page will be. The default is 1 x 1.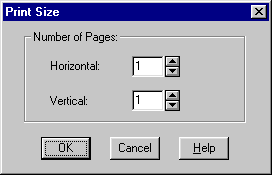
Tip: If you are printing a schema diagram for presentation purposes, consider increasing the number of pages you use to print the diagram.
How to Print a Schema Diagram
Previewing what you print
Use this procedure to print a schema diagram if you want to preview what you print:
- Make any changes you require to the diagram itself. (See Chapter 4, Schema Diagrams for more information.)
- Select File | Print Preview from the menu bar.
- Will the printed diagram be large enough for your purposes?
If yes, click Print. The Print dialog box appears. Go to step 5.
If no, click Close and select File | Print on Multiple Pages from the menu bar and increase the number of pages over which to print the diagram.
- Select File | Print from the menu bar.
The Print dialog box appears.
- Select the print options you want.
- Click OK to print the schema diagram.
Shortcut procedure
Use this procedure if you do not want to preview what you print:
- Select File | Print from the menu bar.
Alternative: Click the Print tool on the toolbar. The Print dialog box appears.
- Select the print options you want.
- Click OK to print the schema diagram.
Printing Collection Grids
This section describes how to print collection grids.
Before You Begin
Before printing a collection grid, you might want to make some of the following modifications, which affect the appearance of the grid both in Inspector and on the printed page.
You can
For more information: See Chapter 5, Classes and Instances for information on modifying the instance format. See Chapter 6, Collection Grids and Lists to learn about customizing collection grids.
Page Setup Options
Page setup options differ from those listed above in that they affect only the printed page, and not the grid display itself.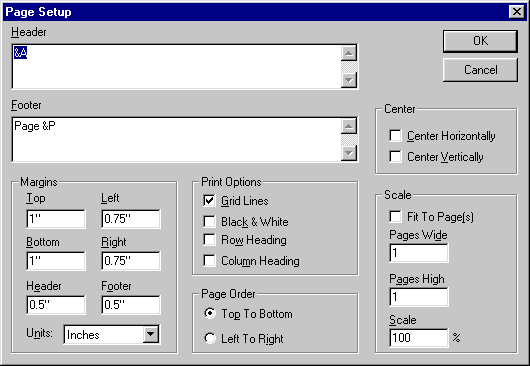
You open the Page Setup dialog box by selecting Grid | Print Page Setup from the menu bar.
The following sections describe the page setup options.
Header/Footer
You use the Header and Footer fields to define the text you want to appear in the headers and footers of the printed page. By default, the header prints the class name and page count in the following format:
class name #/ #
The footer prints the page number, as follows:
Page #
The following table describes the formatting codes you can use in headers and footers. These codes are case insensitive.
In addition, you can use the following codes to control character formatting. They must appear before the codes in the preceding table, or they are ignored
Center
You use the check boxes in the Center group box to center the grid on the page. You can center the grid horizontally, vertically, or both.
Margins
You use the fields in the Margins group box to specify the area you want to leave for the top/bottom, left/right, and header/footer margins. The default unit is inches, but you can change it using the Units drop-down list box.
Print Options
You use the Print Options group box to indicate whether or not you want the following elements to appear in the printed grid:
Page Order
You use the choices in the Page Order group box to indicate the page order in which you want to print a grid that spans multiple pages. Top To Bottom prints all the instances first; Left To Right prints all data members first.
Scale
You use the fields in the Scale group box to control the scale of the grid relative to the number of pages on which you choose to print it.
How to Print a Collection Grid
To print a collection grid:
- Make any changes you require to the instance format or the grid page setup.
- Select Grid | Print from the menu bar.
The Print dialog box appears.
- Select the print options you want.
- Click OK to print the instance grid.
Printing Navigation Trees
This section describes how to print navigation trees, which are displayed in the Navigation window.
Before You Begin
Before printing a navigation tree, you might want to change the layout. See "Formatting navigation trees" for more information.
Controlling Printed Output
There are several features that help you control the printed output of a navigation tree.
Print Preview
Print Preview (File | Print Preview) shows you how the navigation tree will be printed relative to a single page.
Print on Multiple Pages
Print on Multiple Pages (File | Print on Multiple Pages) lets you change the number of pages (horizontal and vertical) over which the navigation tree will be printed. Generally speaking, the more pages you use, the larger the symbols on the printed page will be. The default is 1 x 1.
Tip: If you are printing a navigation tree for presentation purposes, consider increasing the number of pages.
How to Print a Navigation Tree
Previewing what you print
Use this procedure to print a navigation tree if you want to preview what you print:
- Change the navigation tree layout if desired. (See "Formatting navigation trees" for more information.)
- Select File | Print Preview from the menu bar.
- Will the printed navigation tree be large enough for your purposes?
If yes, click Print. The Print dialog box appears. Go to step 5.
If no, click Close and select File | Print on Multiple Pages from the menu bar and increase the number of pages over which to print the navigation tree.
- Select File | Print from the menu bar.
The Print dialog box appears.
- Select the print options you want.
- Click OK to print the navigation tree.
Shortcut procedure
Use this procedure if you do not want to preview what you print:
- Select File | Print from the menu bar.
Alternative: Click the Print tool on the toolbar. The Print dialog box appears.
- Select the print options you want.
- Click OK to print the navigation tree.
[previous] [next]
Copyright © 1999 Object Design, Inc. All rights
reserved.
Updated: 05/07/99 16:44:01